The BCI Atomizer
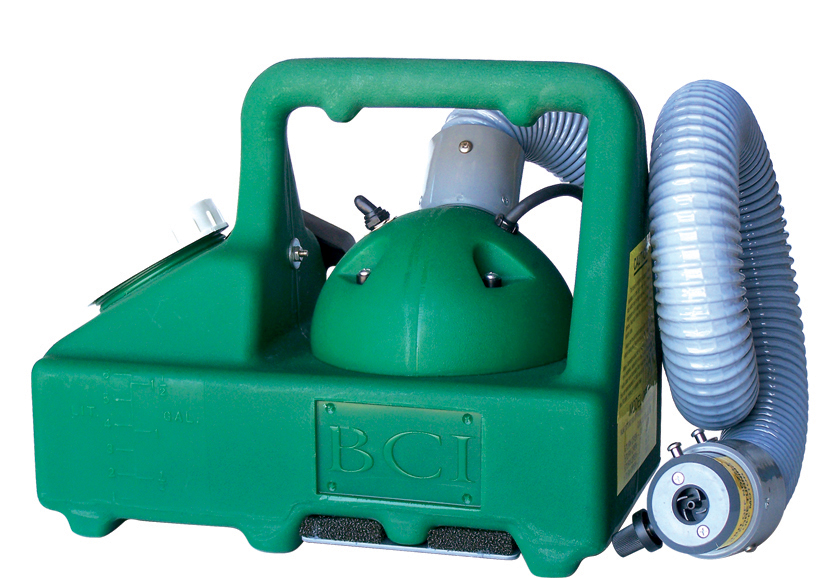 The BCI Atomizer provides the widest range of options available for cold atomizing applications. The nozzle, attached to the 48” flex hose, allows the user to easily direct the flow in, under and at objects. The convenient flow adjustment knob located on the nozzle enables the operator to change the liquid flow rate being dispensed.
The flow rate can be adjusted to dispense materials at average droplet sizes under 20 microns up to 80 microns (water based chemicals at room temperature). The smaller sized droplets remain suspended in air for extended periods of time. However, larger droplets are dispersed by air flow and can settle on surfaces. This characteristic makes the BCI Atomizer useful for applying Bio-Cide International’s chlorine dioxide chemicals used in various applications.
Features
- Roto-molded one piece, seamless, heavy-duty copolymer tank
- 3 1/2” wide tank opening for easy fill
- Provides a mist coating up to 20 ft
- 1 1/2 gallon tank capacity
- 2- stage fan motor
- Variable flow from ULV to light mist
- Adjustable flow from 0-18 oz/min
- Nozzle mounted on 48” hose
- Impact resistant
- Excellent air velocity for creating extremely small droplets and dispersing them effectively
- Flow rate can be adjusted to dispense droplet sizes under 20 microns up to 80 microns
- 110/60 Hz motor and 220/240 v motors
- Easy to fill, empty and clean
- Low profile for maximum stability
- Made of corrosion resistant materials
Instructions
Calibrate the Adjustment Knob
- Turn the knob until closed
- Push down on base of knob and align the point with groove on the nozzle
- Release base to set the point
- Push down and turn the base, align with groove
- Adjustment knob open one-quarter to one-half-turn – this delivers a ULV mist.
- The spray cannot be seen because the droplets are very small.
- Adjustment knob open one full turn – this delivers a power mist which is visible from nozzle.
- Adjustment knob open one-quarter to one-half-turn – this delivers a ULV mist.
Filling
- Do not add more than 1.5 gallons (5.5 liters) liquid to the tank.
- Do not mix chemical in the tank; pre-mix and then add to the tank
- Mix all chemicals according to label directions.
Placement during Operation
- Never place atomizer directly on floor, always elevate to keep dust and moisture out of atomizer.
- Do not operate atomizer in enclosed or small areas for more than 30 minutes.
When Finished
Turn atomizer off, follow this sequence
- Turn off adjustment knob
- Turn off electric power
- Open the tank cap.
Turn off the adjustment knob before turning power off
Note: Failure to follow this sequence can result in liquid dripping into the hose and eventually reaching and destroying the motor.
Care and Maintenance
- Always empty and flush the tank after each use; never leave chemicals in tank for extended periods
- Inspect spray hose and electric cord for wear or damage.
- Protect nozzle when not in use.
- Clean the filters on the bottom plate of the atomizer; be certain to replace (this protects the motor)
Clean filter regularly
Safety Precautions
- Connect unit to the designated electrical supply: Do not connect 110v units to 220 v power
- Do not connect 220v units to 110v power
- Do not move or position the atomizer by pulling it by the electrical cord.
- Always use a grounded (3 terminal) extension cord.
Trouble Shooting
- Problem: Power mist is weak
- Solution: Tighten the cap
- Problem: Liquid forms around the base of the motor housing, around the mounting screws
- Solution: Unit may have been operating too long and droplets in the air are forming on the metal screws
- Problem: Atomizer is operating erratically; frequently turning on and off
- Solution: Inspect the electric cord and the plug for damage – Motor may be damaged from moisture, replace motor
- Problem: Atomizer becomes very warm (hot) during normal operation
- Solution: Remove the lower plate (motor guard) and clean the filters with a nylon brush
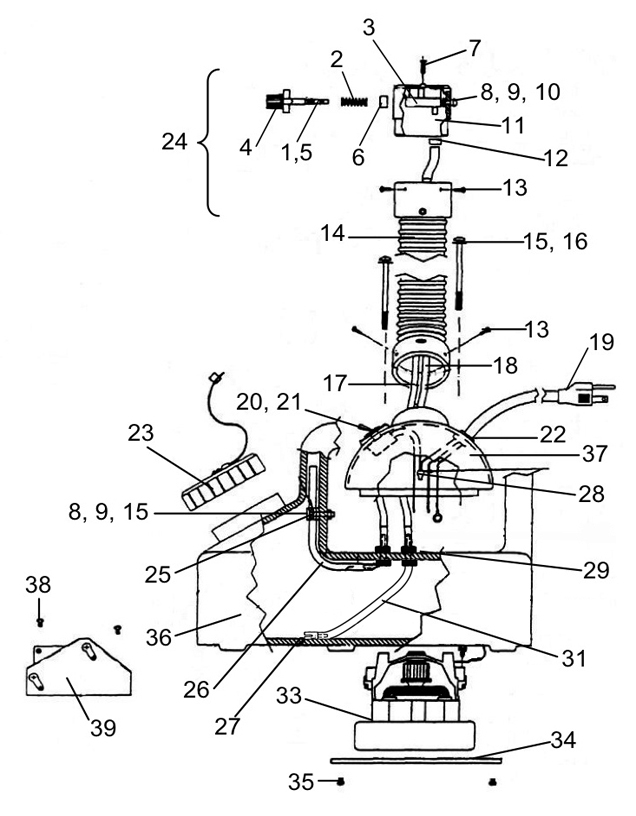
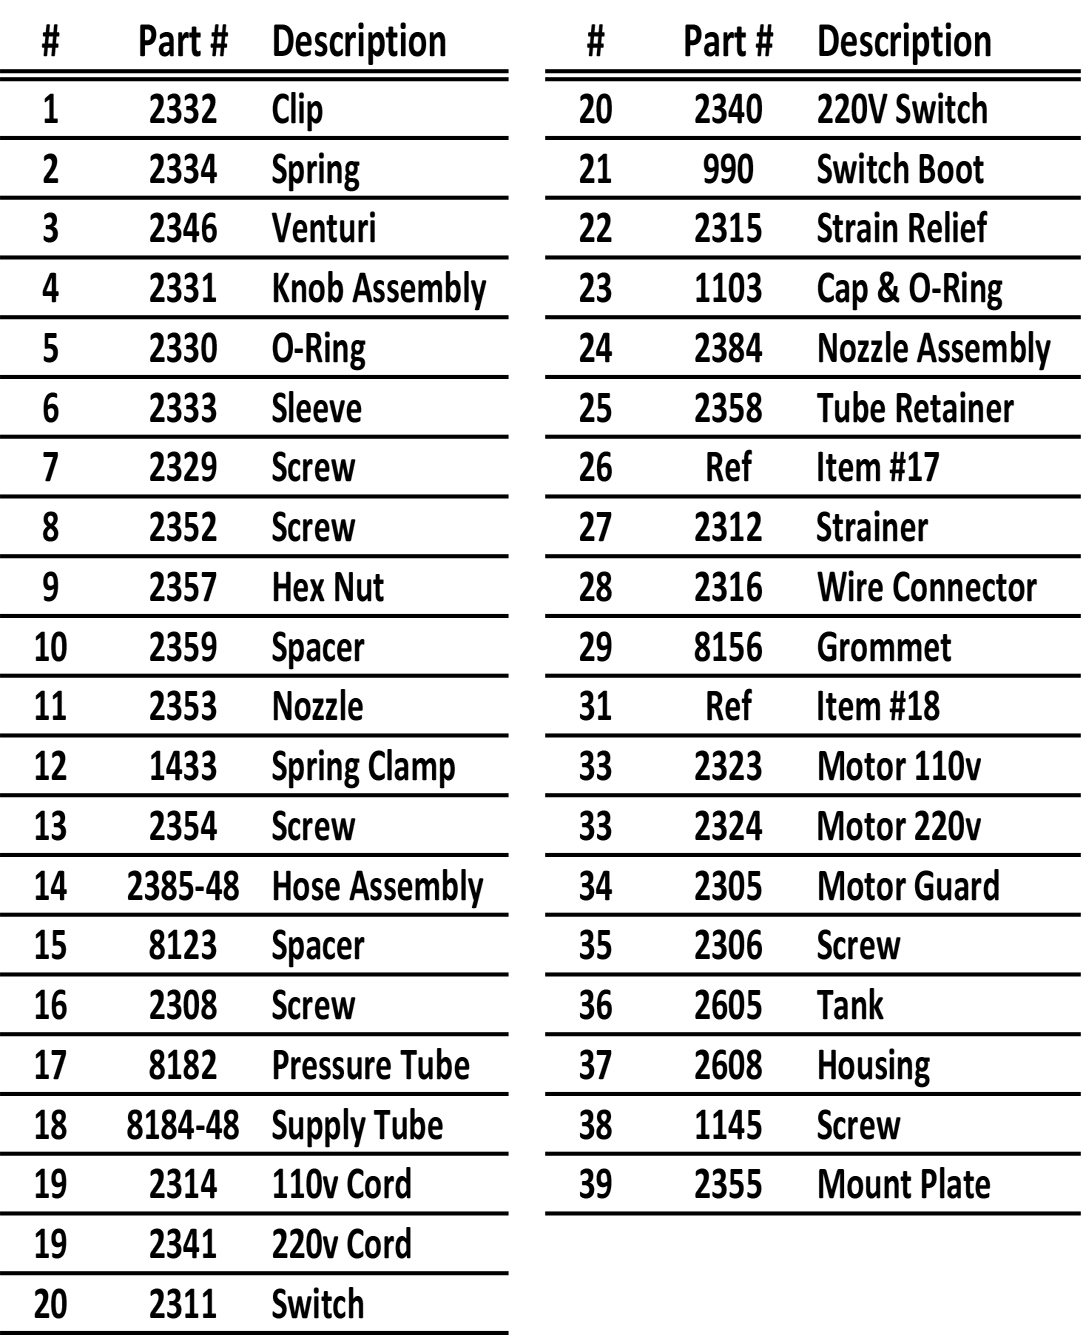
Replacement Parts List